The discovery and archaeological examination of submarine AE1
by Dr James Hunter (Australian National Maritime Museum), Irini Malliaros (Silentworld Foundation) and Dr Andrew Woods (Curtin University HIVE)
On 20 December 2017, a collaborative team comprising researchers and specialists from the Silentworld Foundation (SWF), Australian National Maritime Museum (ANMM), Find AE1 Ltd., the Royal Australian Navy (RAN) and Fugro, N.V. identified the final resting place of HMAS AE1 off the Duke of York Islands in Papua New Guinea. The discovery of Australia’s first submarine was the culmination of more than a century of efforts to solve the riddle of its disappearance in September 1914, and learn the fate of its crew of 35. Information gleaned from the 2017 survey, as well as a follow-up ROV examination in April 2018, has at last revealed the cause of AE1’s loss, and brought closure to Australia’s oldest naval mystery.
AE1 at Portsmouth, England in early 1914 shortly after being commissioned into the Royal Australian Navy. Image: Sea Power Centre Australia.
Submarine AE1
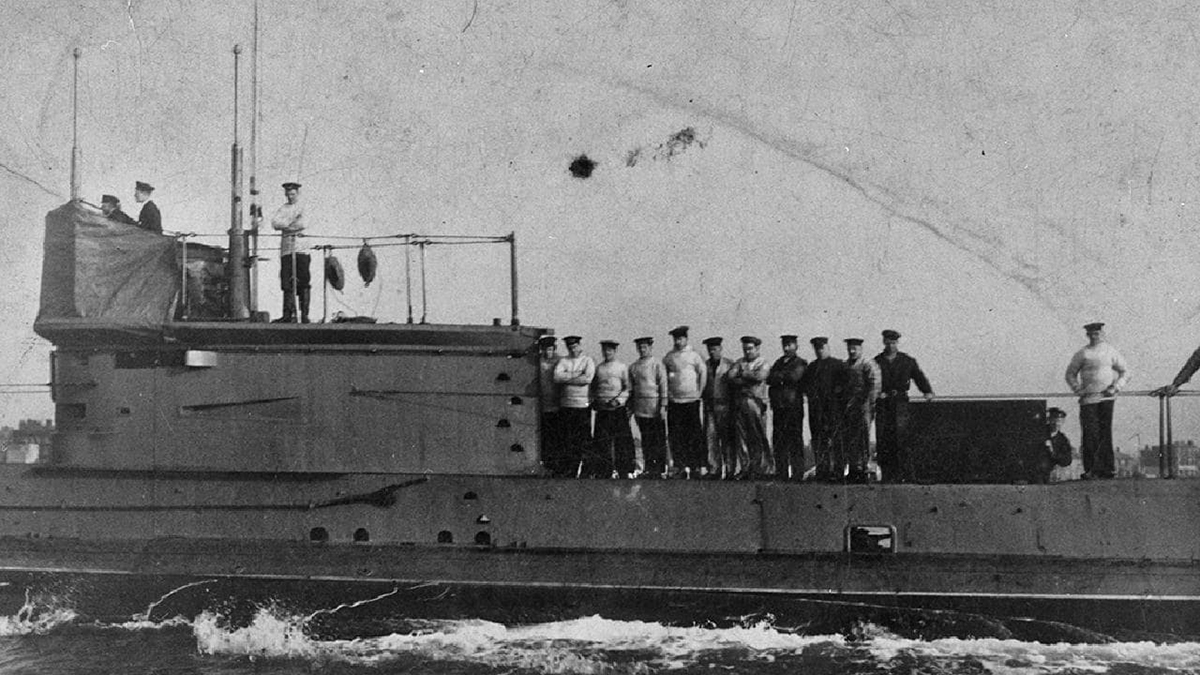
The establishment of the RAN in 1911 coincided with revolutionary changes in naval tactics and technology. The British Admiralty’s First Sea Lord, Admiral Sir John ‘Jacky’ Fisher, foresaw the immense value of submarines in naval warfare, and recommended their use in the Royal and Commonwealth navies. This, and their relative affordability, led Australian Prime Minister Alfred Deakin to commit the RAN to buy two submarines for its new fleet. AE1, the first to be built, was laid down in November 1911 at the British shipyard of Vickers Armstrong Ltd. It was launched two years later, commissioned into the RAN on 28 February 1914, and then voyaged to Australia with its sister-submarine AE2. Both boats were commanded by Royal Navy officers and crewed by a mix of British and Australian ratings. AE1’s crew also included one New Zealander.
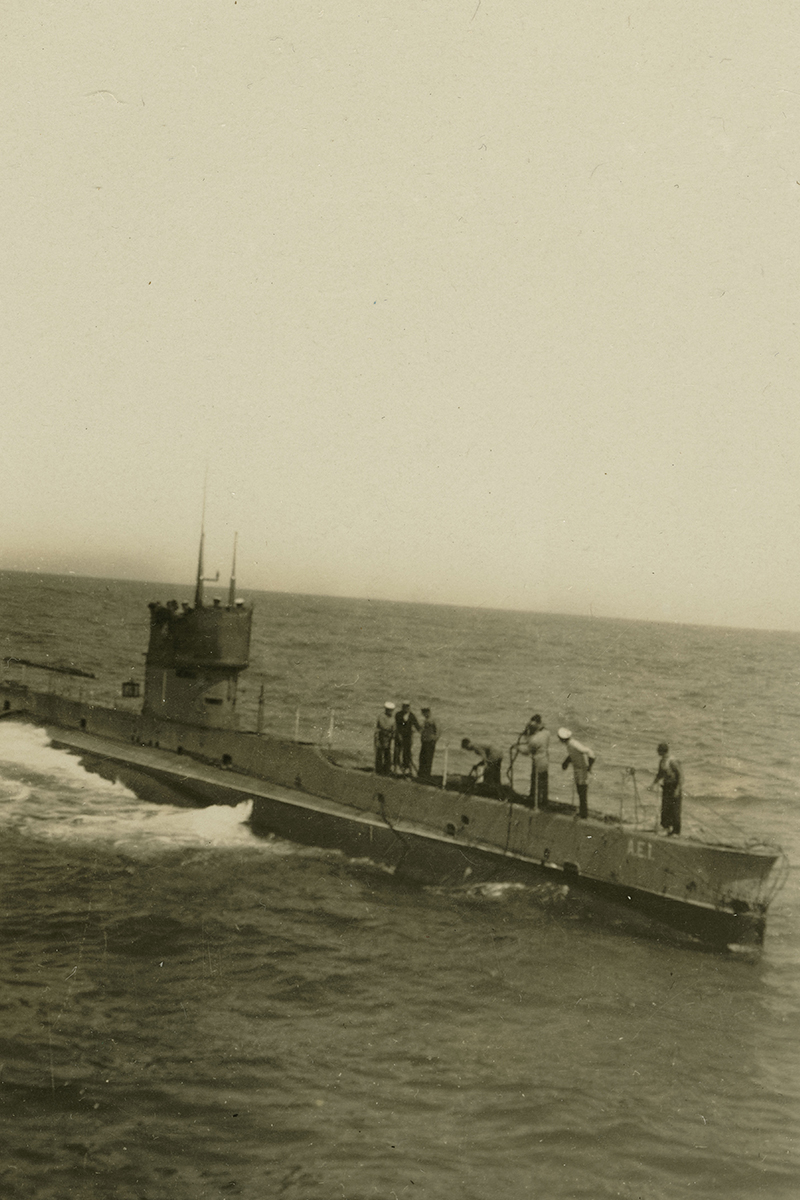
AE1 preparing to be towed while on its delivery voyage to Australia, 1914. The trip spanned a distance of nearly 21,000 kilometres and was the world’s longest submarine transit at the time. ANMM Collection 00015811.
Following the outbreak of the First World War, AE1 joined the Australian Naval and Military Expeditionary Force (ANMEF) and departed for German New Guinea. The ANMEF was tasked with seizing and destroying German wireless stations there and in the southwest Pacific islands. These combined operations resulted in the surrender of Rabaul on 13 September 1914, and the beginning of Allied occupation of German New Guinea. On the morning of 14 September 1914, AE1 departed Rabaul to patrol for German warships with the torpedo boat destroyer HMAS Parramatta (I). The two vessels separated during the late morning, but rendezvoused in the afternoon. At 3:20 pm, Parramatta’s crew lost sight of the submarine off the Duke of York Islands and couldn’t re-establish contact. Parramatta’s commander was not concerned, as he assumed AE1 had returned to Rabaul.
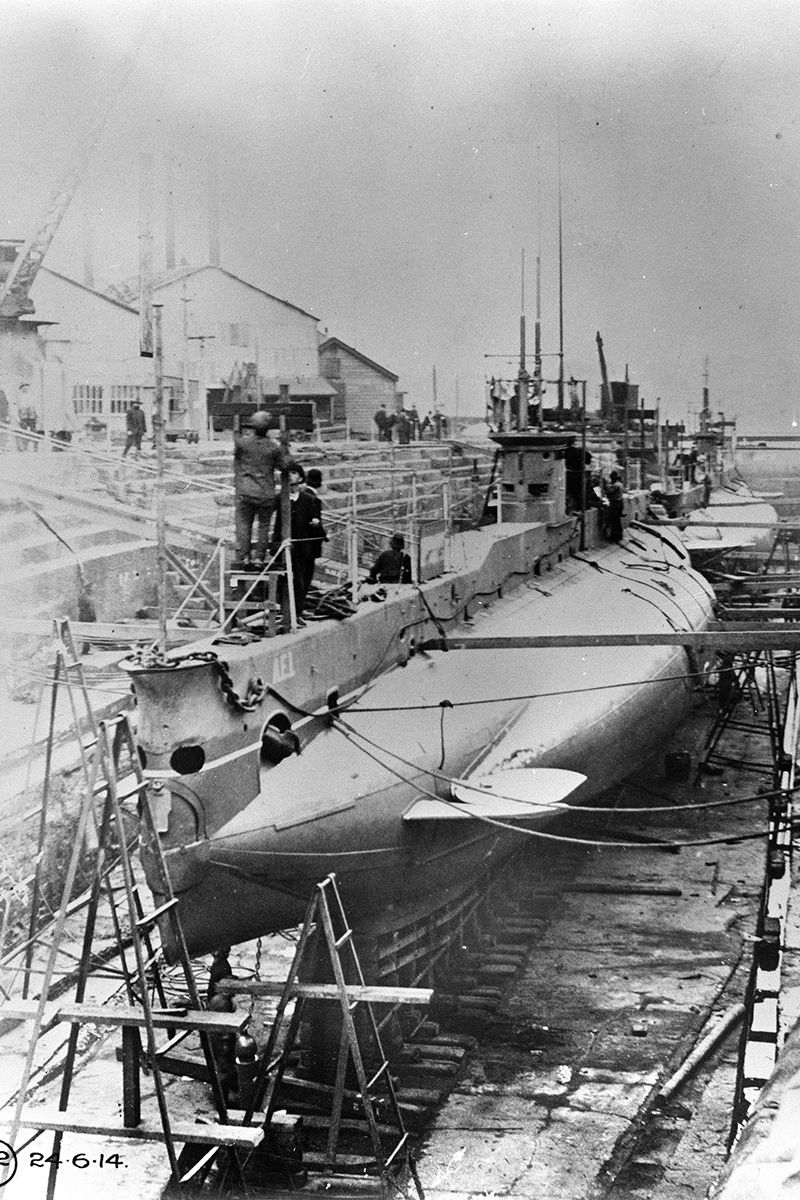
AE1 undergoing refit at Cockatoo Island Dockyard in June 1914. Its sister-submarine AE2 is visible in the background. Image: Royal Australian Navy.
Concerns about AE1 only emerged when the submarine failed to return to Rabaul by 8:00 pm. A search started immediately and included several Australian warships. Despite covering a vast area that included AE1’s most probable return course south and east of the Duke of York Islands, no trace of the submarine was ever found. One Australian crew observed an oil slick, but this was disregarded, as it was 30 nautical miles (56 kilometres) northwest of AE1’s last known position. After three days, the search was called off. An inquiry concluded that the submarine most likely struck a submerged reef while diving and then sank in deep water. AE1’s loss exacted a terrible toll: the incident claimed three officers and 32 crew. It was the RAN’s first wartime vessel loss, and would become Australia’s most enduring naval mystery.
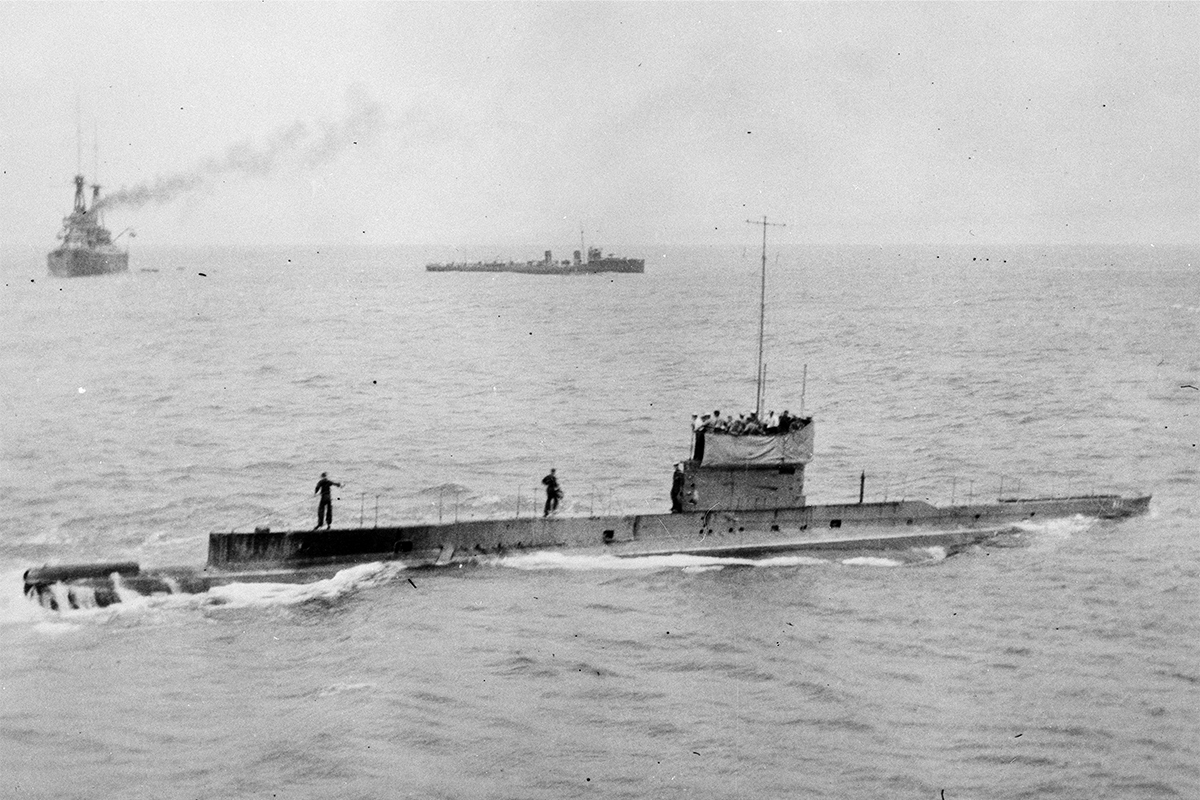
The last known photograph of AE1 prior to its disappearance shows the submarine near Rossel (Yela) Island in the Louisiade Archipelago on 9 September 1914. Image: Royal Australian Navy.
Modern searches
For more than 60 years the submarine and its crew were largely forgotten. Renewed interest in finding AE1 commenced during the 1970s through the efforts of Commander John Foster, Australia’s then-Assistant Defence Attaché to Papua New Guinea. Foster was intrigued by the submarine’s disappearance, and consulted various Australian archives to try to identify its loss location. In 1976, Foster surveyed a possible location with a RAN hydrographic survey ship. The survey was unsuccessful. Undeterred, Foster continued to scour relevant archives, visited Rabaul and the Duke of York Islands to determine if AE1 was mentioned in the oral histories of local residents, and organised additional searches in 2002, 2003, 2007 and 2009. All were unsuccessful. Jacques Cousteau also attempted to locate AE1 while transiting between New Britain and New Ireland in 1990, but failed to detect anything of interest.
Commander John Foster, RAN (centre) disembarking from the Royal Australian Navy’s survey motor launch HMAS Benalla, 27 February 2007. Foster directed efforts to locate AE1 between the 1970s and his death in 2010. Photographer: Gus Mellon/Find AE1 Ltd.
HMAS Benalla conducts a multi-beam sonar survey for AE1 off Mioko Island, February 2007. Photographer: Gus Mellon/Find AE1 Ltd.
In 2014, a RAN minesweeper searched for AE1 in waters directly east of Mioko Island, a small islet off the east coast of the Duke of York Islands. One year later, the non-profit organisation Find AE1 Ltd. undertook a multi-beam echo sounder (MBES) survey in deep waters east and south of the Duke of York Islands. Both searches detected numerous intriguing anomalies, but all were ruled out as the wreck of the long-lost submarine. In the wake of the 2015 expedition, Find AE1 Ltd. organised a workshop at ANMM with the goal of re-evaluating AE1’s final voyage and determining its most likely loss location based on the results of archival research, predictive modelling, and prior searches. By late 2017, a high-priority survey area was established.
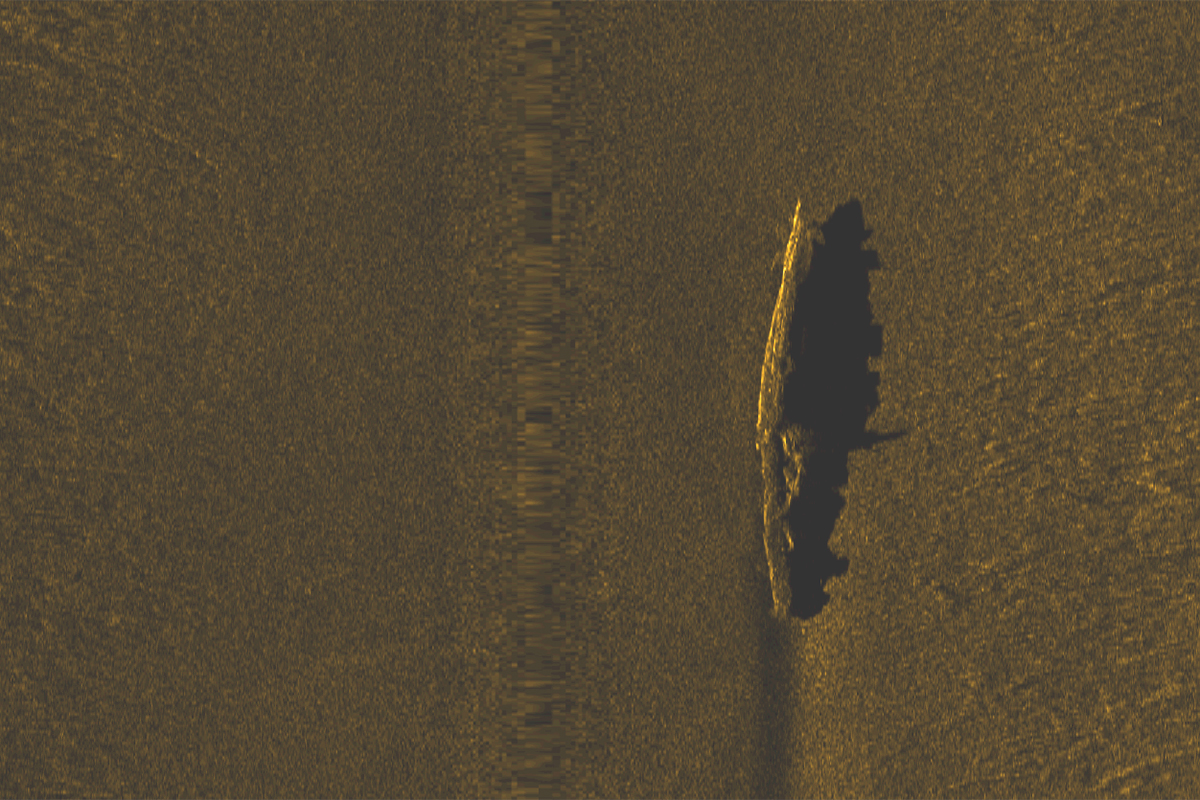
This image acquired by the AUV’s side scan sonar provided the first glimpse of AE1 since its disappearance in September 1914. Image: ANMM/Find AE1 Ltd.
Success
The 2017 expedition was originally slated for 2018, but commenced ahead of schedule due to a generous offer from Fugro N.V. for the use of one of its deep-water survey vessels, Fugro Equator. John Mullen, founder and director of SWF, gave his personal guarantee for half of the funding required to undertake the search for AE1. With SWF’s financial guarantee in place, the Australian Government committed the other half, thereby ensuring the survey would proceed. SWF also launched a fundraising campaign in the lead-up to the expedition and secured the support of several corporate sponsors. Additional financial support for the project was provided by the Submarine Institute of Australia, ANMM and Fugro N.V. Members of Find AE1 Ltd. provided expertise relevant to AE1’s history, operation and engineering, while the expedition’s maritime archaeologists were drawn from SWF and ANMM. RAN personnel served as project and media liaisons for the Australian Government. Operation of survey equipment and processing of data was performed by Fugro Equator’s remote-sensing specialists.
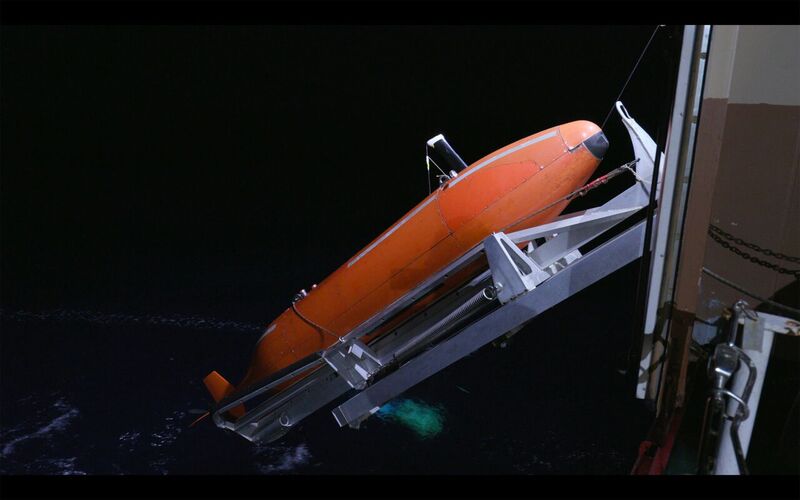
Fugro Equator’s Autonomous Underwater Vehicle (AUV) conducted a pre-programmed search of the seabed in the survey area with an array of in-built sonar equipment. Image: ANMM/Find AE1 Ltd.
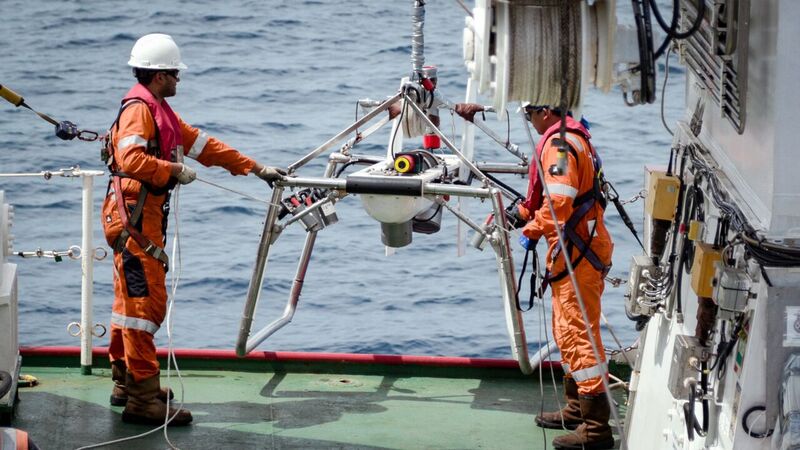
A drop-camera was used to examine the side scan sonar ‘contact of interest’ that was ultimately identified as AE1. Image: ANMM/Find AE1 Ltd.

Members of the Find AE1 expedition team with representatives from Fugro Survey in Simpson Harbour, Rabaul, Papua New Guinea. From left: Tanesh Thanapalan (Fugro Survey), Paul Hundley (Silentworld Foundation), Rear Admiral Peter Briggs AO CSC RAN(Rtd) (Find AE1 Ltd), Captain Roger Turner RN Rtd (Find AE1 Ltd), Chandran Karapiah (Fugro Survey), Lieutenant James McPherson RANR (Royal Australian Navy), Gus Mellon (Find AE1 Ltd), Andrej Masloboev (Fugro Survey), Magnus Windle (Fugro Survey), Nigel Erskine (Australian National Maritime Museum), Irini Malliaros (Silentworld Foundation). Image: ANMM/Find AE1 Ltd.
The research team assembled in Papua New Guinea in mid-December 2017 to commence the search. Fugro Equator deployed an array of cutting-edge marine survey equipment, including a hull-mounted MBES and an Autonomous Underwater Vehicle (AUV). The AUV was launched from the ship and systematically searched the survey area with its own inbuilt MBES system, as well as side-scan sonar and a sub-bottom profiler.
On 19 December 2017, the AUV detected a promising sonar contact at a depth of over 300 metres. A drop-camera was deployed the following morning to allow the expedition team to examine it in greater detail. Still and video imagery broadcast into Fugro Equator’s control room revealed unmistakable features of AE1’s hull, including its fore and aft hydroplanes, twin periscopes, and distinct fin (the casing that surrounds the conning tower). The AUV was then re-deployed to the site, and captured thousands of high-resolution still images as it passed over the hull. These were later stitched together to form a comprehensive photomosaic.
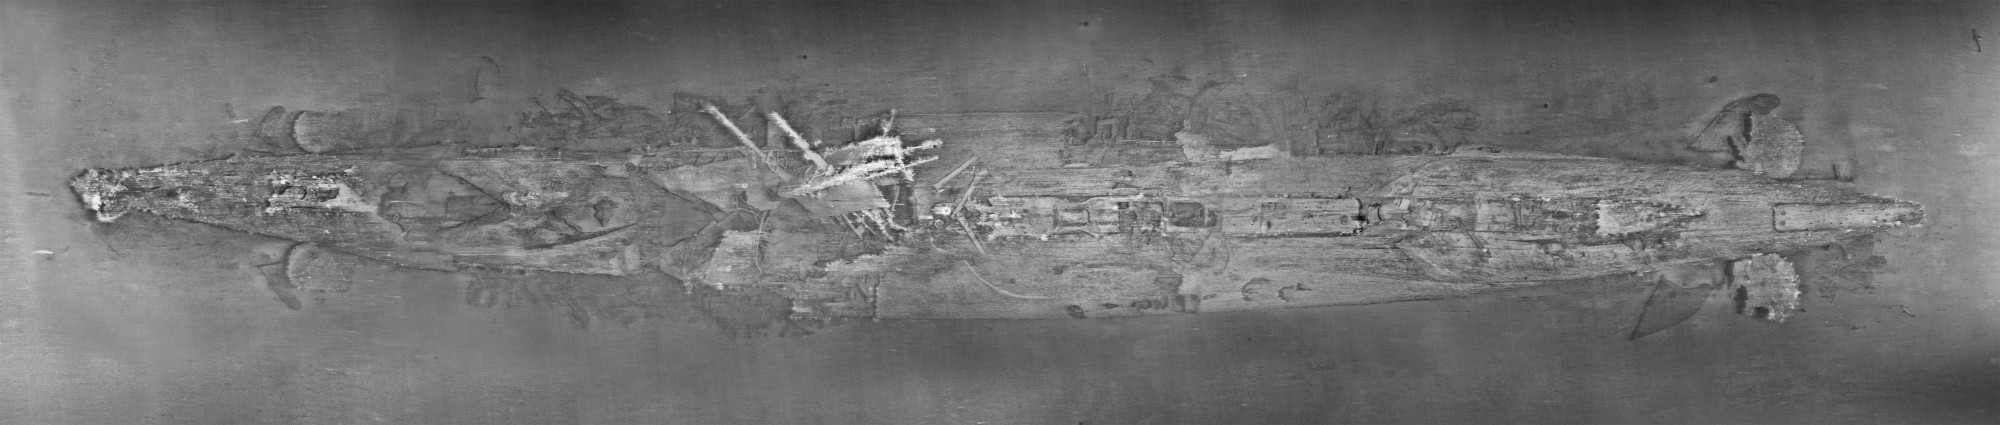
A detailed two-dimensional photomosaic of AE1 was generated from over 6,000 digital images taken by Fugro Equator’s AUV. Image: ANMM/Find AE1 Ltd.
Archaeological examination and photogrammetric survey
The mystery of AE1’s final resting place was now solved, but why the submarine sank was still an open question. Although imagery from the 2017 expedition provided important clues, an opportunity arose in early 2018 to return to AE1 for a closer look.
In April, a collaborative team consisting of researchers from ANMM, Find AE1 Ltd., and Curtin University’s HIVE (Hub for Immersive Visualisation and eResearch) participated in a Remotely-Operated Vehicle (ROV) examination of the submarine. The ROV examination was conducted gratis from R/V Petrel, a research vessel owned by Microsoft co-founder Paul G. Allen and operated by Vulcan, Inc., the company that oversees Mr. Allen’s network of philanthropic organizations and initiatives.
The mystery of AE1’s final resting place was now solved, but why the submarine sank was still an open question...
Because AE1 is located in over 300 metres of water, the site examination was conducted via Petrel’s Work-Class ROV, which was outfitted with an array of Standard- and High-Definition video cameras. These cameras were augmented by a specially-designed 12-megapixel deep-water digital still camera provided by Curtin University and the Western Australian Museum (WAM) for the purpose of developing a 3D photogrammetric model of the shipwreck site. The same camera had been used, amongst a suite of photographic equipment, by Curtin University and WAM to capture photogrammetric imagery of the Second World War shipwrecks HMAS Sydney (II) and HSK Kormoran in 2015.

Petrel’s ROV is launched during the 2018 examination of AE1. The ROV has a maximum depth limit of 6,000 metres and was outfitted with an array of still and video cameras. Image: Paul G. Allen, Find AE1 Ltd., ANMM and Curtin University. Copyright, Navigea Ltd.
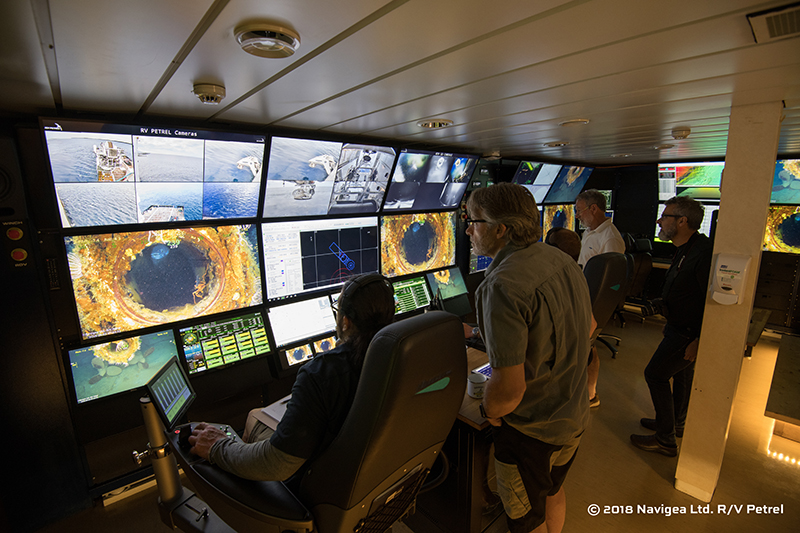
Expedition members participating in the 2018 ROV examination of AE1 watch live footage of the submarine’s stern torpedo tube in the control room aboard the research vessel Petrel. Image: Paul G. Allen, Find AE1 Ltd., ANMM and Curtin University. Copyright, Navigea Ltd.
Archaeological examination and documentation of AE1 took place over the course of two days and involved five separate dives by Petrel’s ROV. The first dive confirmed the submarine’s location and identity, and served as an opportunity for the ROV operators to familiarise themselves with the wreck site and its environmental conditions, and identify potential hazards (such as protruding structure that could foul the ROV’s tether). It also provided the research team with its first detailed glimpse of AE1, which proved useful in identifying features of interest and refining the survey strategy for subsequent dives.
The inaugural dive also allowed Petrel’s crew to ensure the ROV was operating properly, and to check and colour-correct the video camera array. At the end of the first dive, the photogrammetric still camera was installed on the ROV’s pan-and-tilt mechanism. It was one of the backup still cameras used to document the Sydney and Kormoran shipwrecks, and chosen because it was relatively simple to install and operate—a necessity due to the limited timeframe within which the project was organised and undertaken. During the AE1 survey, it was pre-programmed to capture 12-megapixel resolution images every five seconds.
A total of 8,367 images and approximately 25 hours of full high-definition video were collected during the expedition.
Once on site, the ROV ran multiple longitudinal transects along AE1’s hull at a relatively slow (approximately 0.10-knot) pace to allow for required image overlap. Close-order survey was conducted around complex hull features, such as AE1’s fin. During a handful of transects, particular emphasis was placed on capturing images along the submarine’s lower hull at the interface where it meets the seabed. This was done for the explicit purpose of acquiring greater detail in these areas, and contributing to the accuracy and completeness of the overall 3D model.
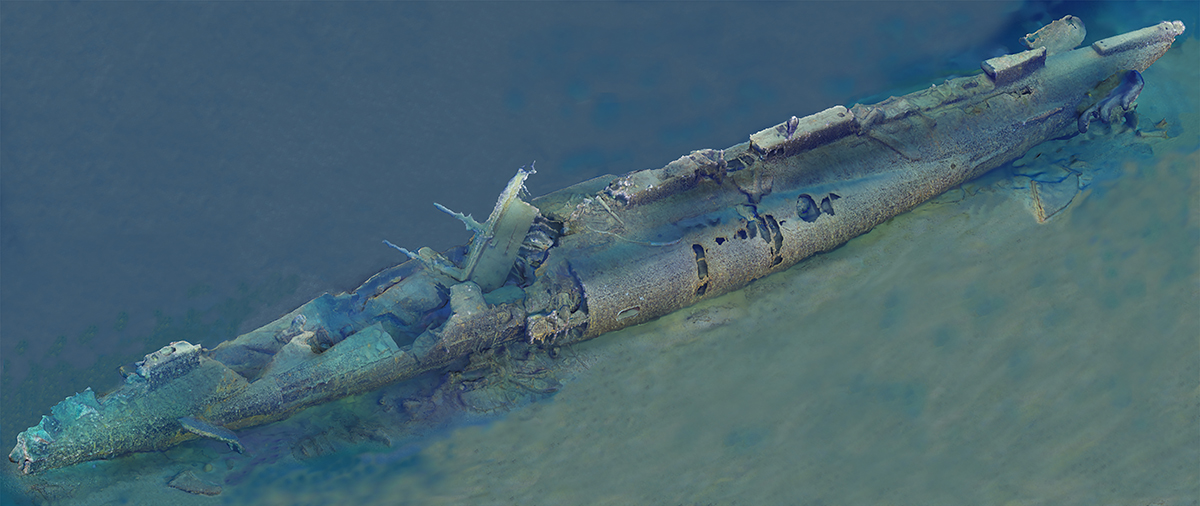
Port side view of the interim 3D photogrammetric model of AE1. A high-resolution 3D model is currently being generated from the more than 8,000 still images at Curtin University’s HIVE (Hub for Immersive Visualisation and eResearch). 3D Model by Curtin University from images courtesy of Paul G. Allen, Find AE1 Ltd., ANMM and Curtin University. Copyright, Navigea Ltd.
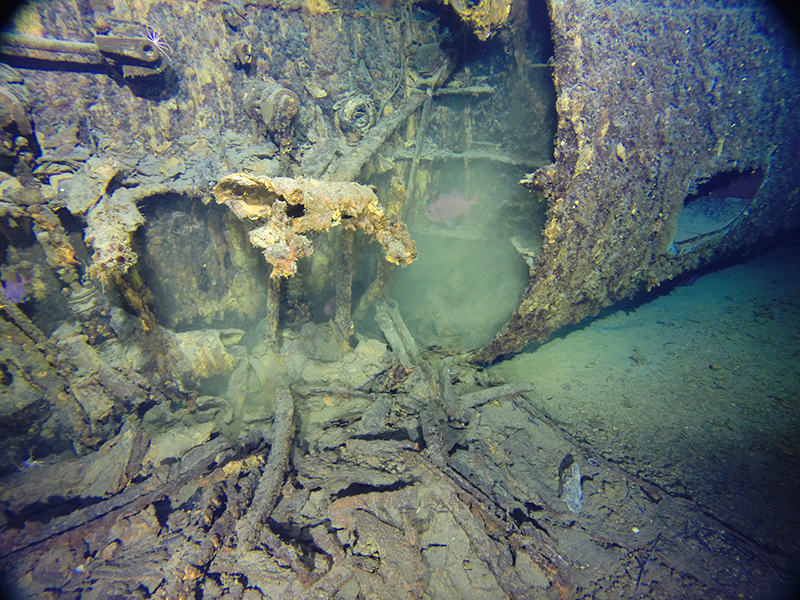
In an effort to document the fragmented remnants of AE1’s side-mounted ‘saddle’ ballast tanks (which now lay in linear piles immediately beneath both sides of the hull), a ‘zig-zag’ pattern was adopted whereby the ROV would approach the hull, then pull away to thoroughly document the extent of the adjacent debris. At the team’s request, a Standard-Definition camera was attached to one of the ROV’s manipulator arms and used to image and closely inspect specific areas of interest, such as the submarine’s open bow and stern torpedo tube caps, the face of the bridge telegraph, and small openings in the pressure hull that could not be adequately imaged with the regular ROV camera array.
A Remotely-Operated Vehicle (ROV) deployed from the research vessel Petrel uses a camera mounted on its manipulator arm to inspect the interior of AE1’s stern torpedo tube. Image: Paul G. Allen, Find AE1 Ltd., ANMM and Curtin University. Copyright, Navigea Ltd.
Once the second ROV dive concluded and image data became available, data processing commenced aboard Petrel to confirm the camera and modelling software were working properly, and generate test models of specific site features. These interim models were in turn employed to find gaps in the image data, and guide subsequent imaging strategy and ROV operations. By the end of the survey, interim low-resolution models had been generated for AE1’s stern and bow sections, starboard ballast tanks, and fin. A total of 8,367 images and approximately 25 hours of full high-definition video were collected during the expedition.
Forward periscope on the Hull. Image: Paul G. Allen, Find AE1 Ltd., ANMM and Curtin University. Copyright, Navigea Ltd.
Survey results
The ROV examination of AE1 confirmed some preliminary observations made during the December 2017 expedition, but also offered a number of new revelations. Detailed still and video imagery, and the generation of a comprehensive 3D photogrammetric model of the submarine, has also resulted in refinement of some conclusions made in 2017.
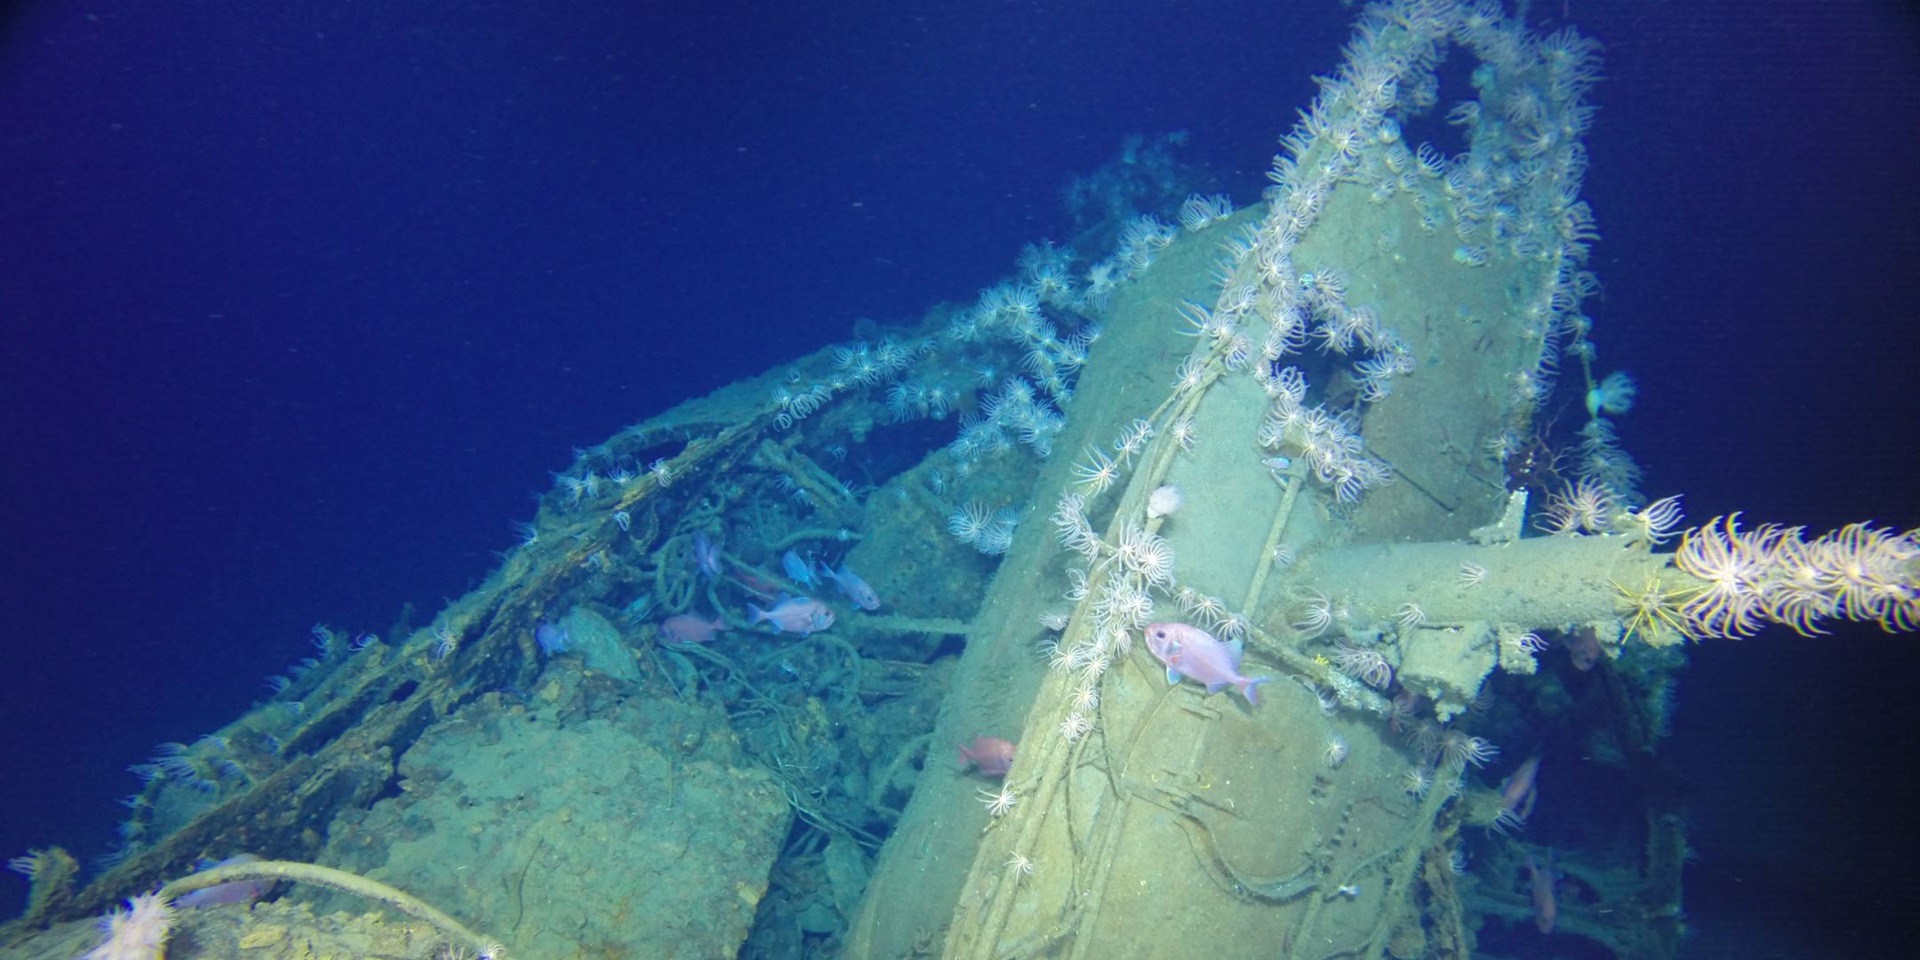
AE1 is resting upright on a largely flat, featureless sand/silt seabed and is almost completely exposed, with only the keel and the tip of a blade from each propeller buried in the surrounding silt. While the approximate aft half of the submarine is largely intact, hull sections forward of the fin have collapsed inwards as a consequence of a catastrophic implosion event. Specific activity areas within AE1 devastated by implosion damage include the control room and forward torpedo compartment. Structural failure of the forward pressure hull has resulted in the fin collapsing and toppling forward into the remnants of the control room.
Damage to AE1’s forward pressure hull from implosion is clearly evident in the ROV footage, still imagery, and 3D model.
Damage to AE1’s forward pressure hull from implosion is clearly evident in the 2018 ROV footage, still imagery, and 3D model. Sections of hull plating have been folded over and collapsed, and the pressure hull completely opened from the forward torpedo room to the control room. Two copper-alloy hand wheels in the forward torpedo compartment have been bent and warped in a shallow ‘U’ shape—attesting to the power of the violent inrush of water as the pressure hull failed. Either as a consequence of the implosion or AE1 striking the seabed (or both), the hull plating at Frame 70 has failed and effectively broken the submarine’s back. This damage is evident in individual images, but the extent of the hull’s failure is best captured by the 3D photogrammetric model, which shows the forward section misaligned and collapsing downwards relative to the rest of the hull.
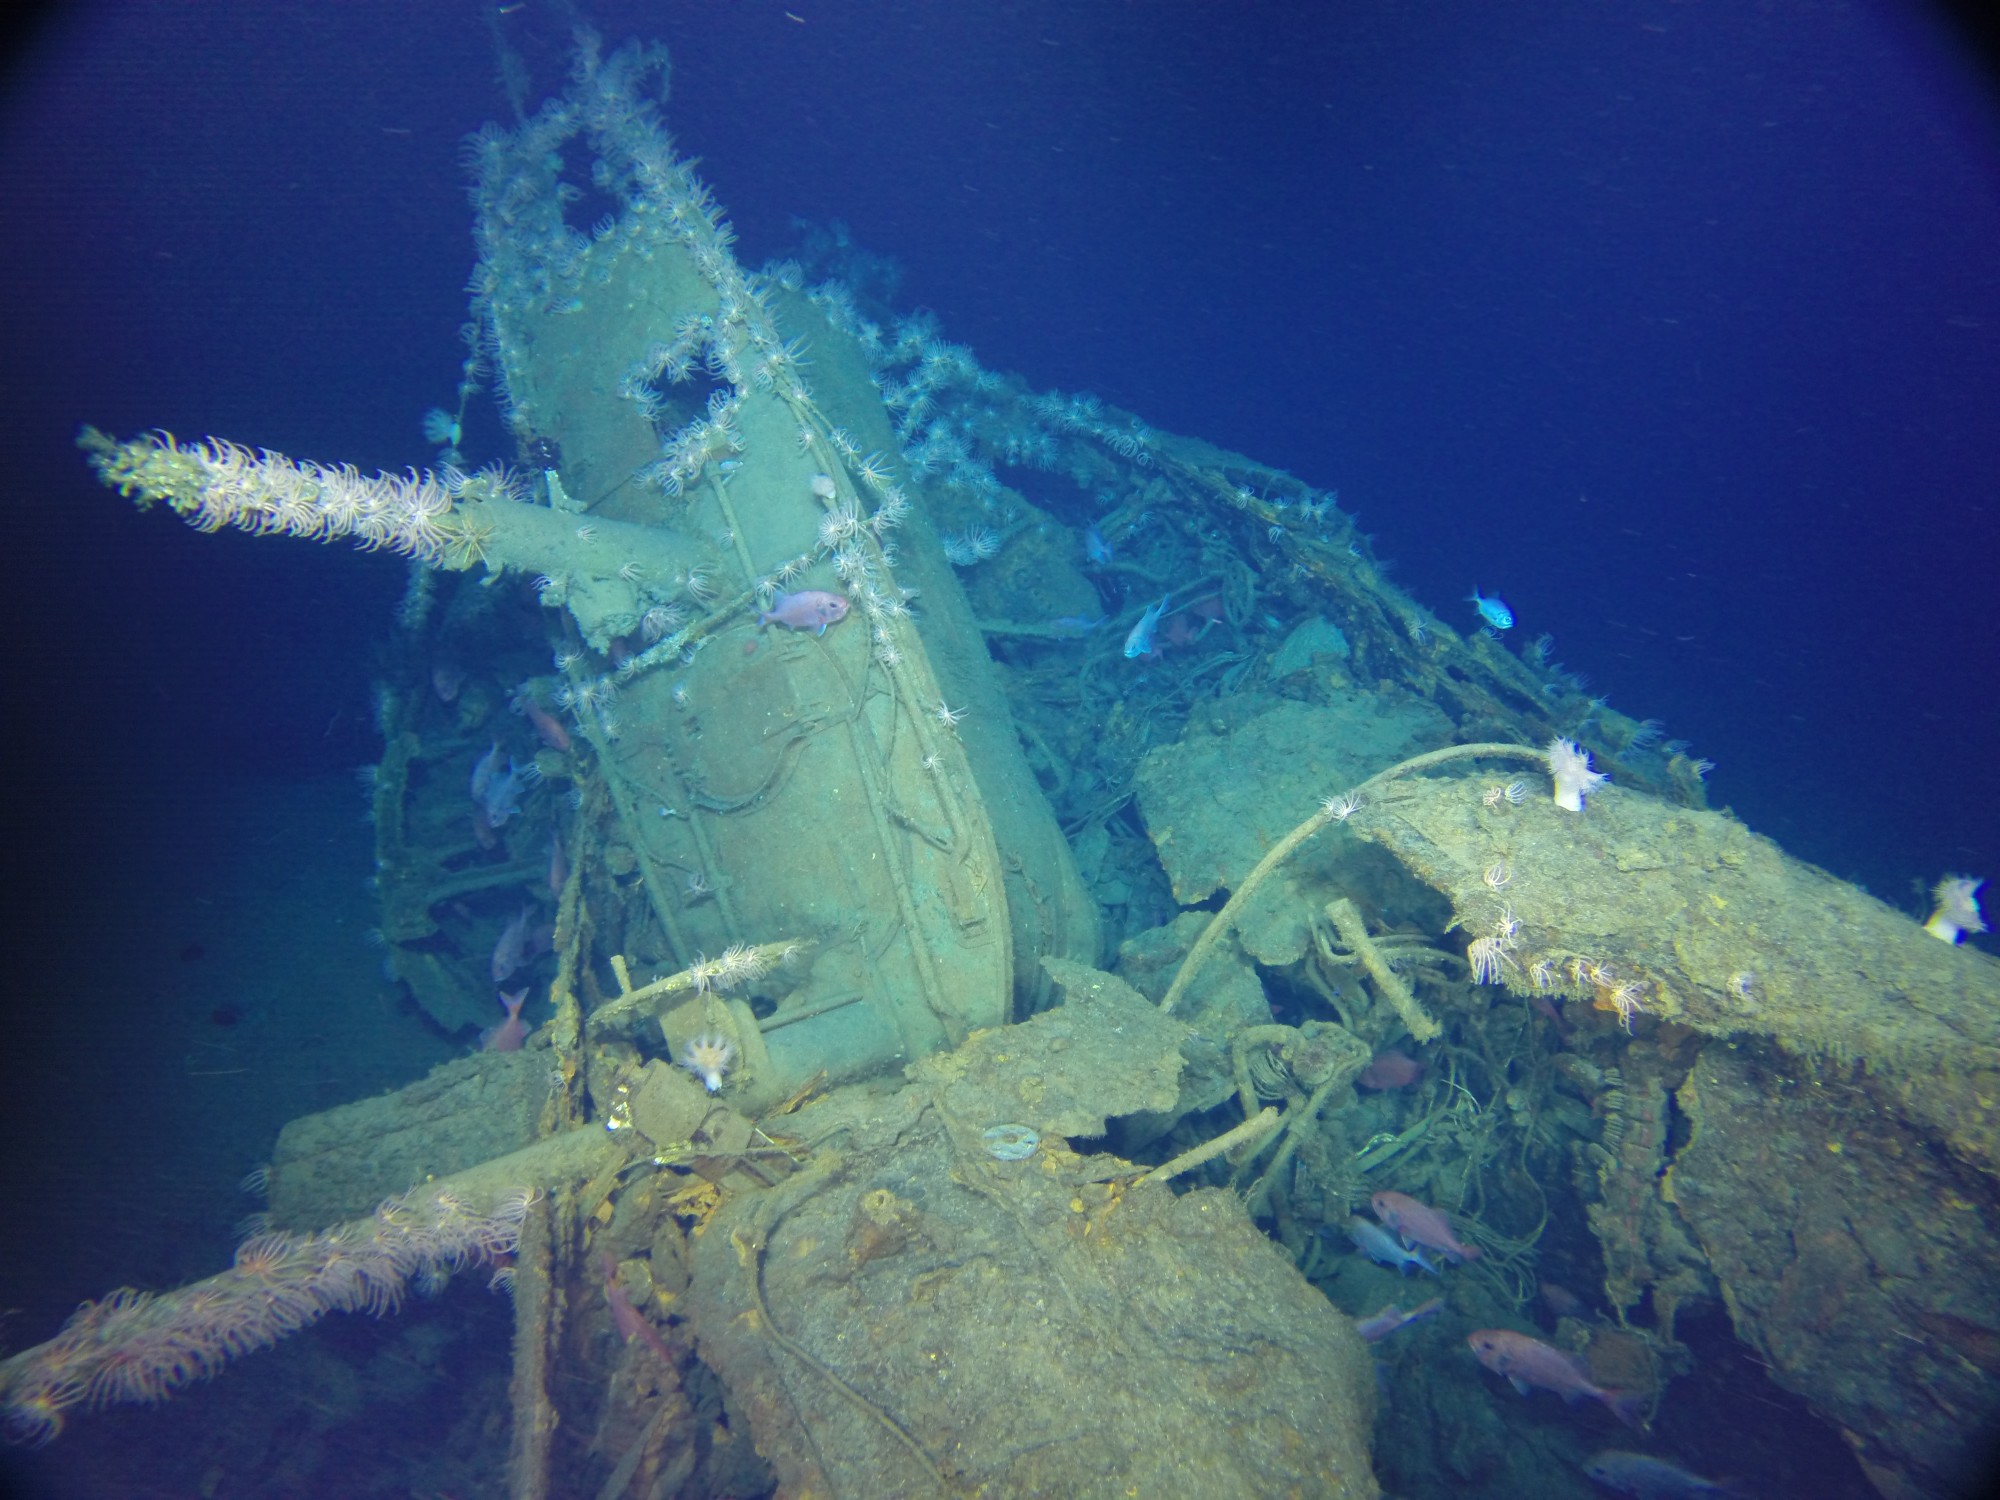
Implosion of AE1’s forward hull has caused the fin to collapse into the remains of the submarine’s Control Room. Image: Paul G. Allen, Find AE1 Ltd., ANMM and Curtin University. Copyright, Navigea Ltd.
AE1’s aft torpedo tube cap was observed in the fully open position—the necessary first step to launch a torpedo. However, the torpedo is protected from sea pressure by a sluice valve, which is shut. This indicates the tube was not fully prepared for firing. The procedure to open the stern cap was via a manually-operated hand-wheel, and the effort necessary to perform this function clearly indicates it was done intentionally. The reason why the cap is open remains unclear; it may have been opened as part of a training exercise, but could also have been a preparatory step to increase the speed with which a torpedo could be launched if AE1 came under attack. The cap for the forward torpedo tube is slightly ajar, but not in the fully open position. The worm gear used to open the forward cap does not appear to be damaged, which suggests it was either partially open—or in the process of being intentionally opened or closed—when the loss of AE1 occurred. The doors for both amidships torpedo tubes—which were positioned athwartships across AE1’s central pressure hull and ballast tanks—are in the closed position.

AE1’s open ventilation valve; arrow indicates the edge of the valve’s sluice plate. Image: Paul G. Allen, Find AE1 Ltd., ANMM and Curtin University. Copyright, Navigea Ltd.
The upper conning tower hatch is closed, and close inspection of the upper helm revealed it is manufactured from copper-alloy and affixed to the periscope standard with a large copper-alloy nut (presumably attached to a threaded bolt). The upper helm also has a copper-alloy steering handle attached to it. Images of the helm within the conning tower revealed that it too is manufactured from copper-alloy but affixed differently—either by a copper-alloy bolt that has been peened over the hub of the wheel, or one that is held on with a nut (or some other means) within or on the other side of the periscope standard. Unlike the upper helm, it does not have a steering handle.
Close inspection of the submarine’s ventilation valve—which was positioned in the after section of the fin, and is currently exposed as a consequence of the fin toppling forward and dislodging the valve’s associated ventilation trunking—revealed that the edge of its sluice plate is positioned across the valve so that it was approximately 60-percent open. Given that the ventilation valve was not completely shut, it would have served as a point of ingress for water while the submarine was submerged, and likely was the primary contributing factor to its loss.
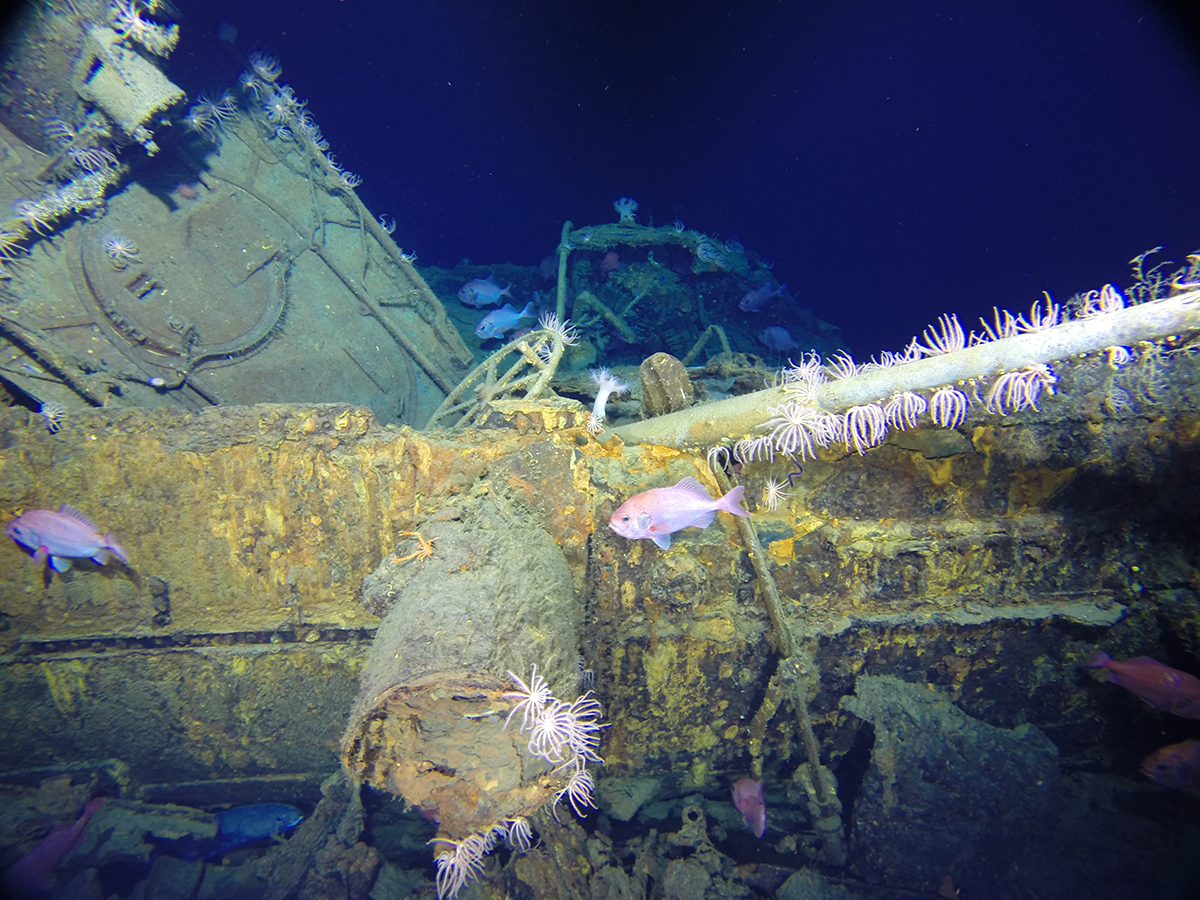
Natural forces such as corrosion have caused most of AE1 ‘saddle’ ballast tanks to disintegrate and collapse to the seabed. The opening for the submarine’s port side amidships torpedo tube is visible at image far right. Image: Paul G. Allen, Find AE1 Ltd., ANMM and Curtin University. Copyright, Navigea Ltd.
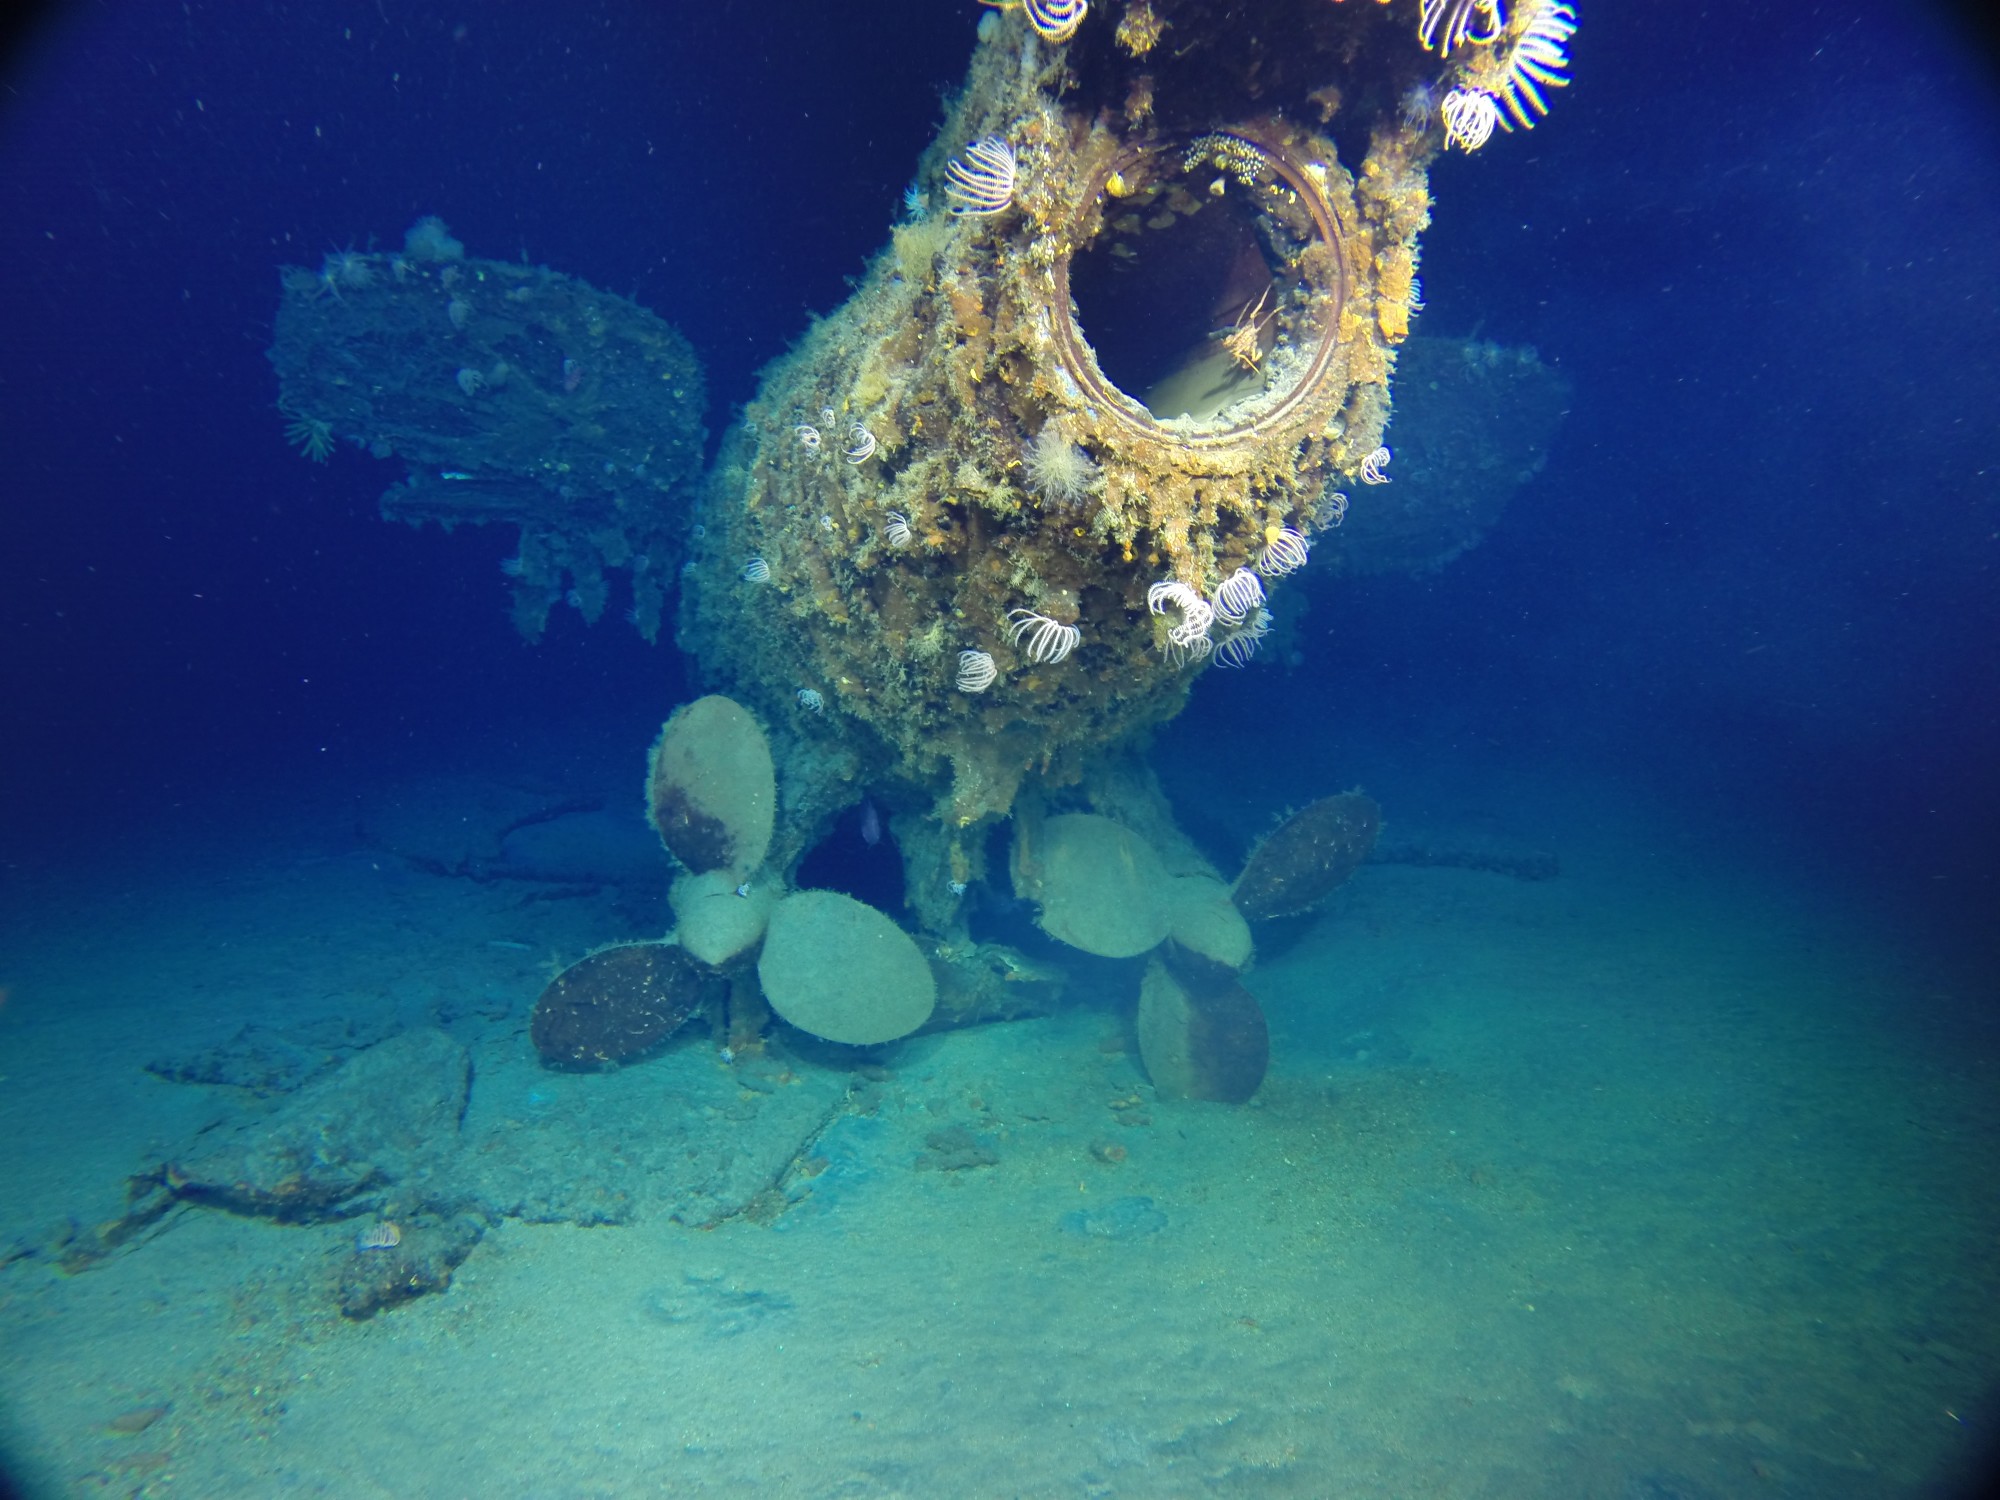
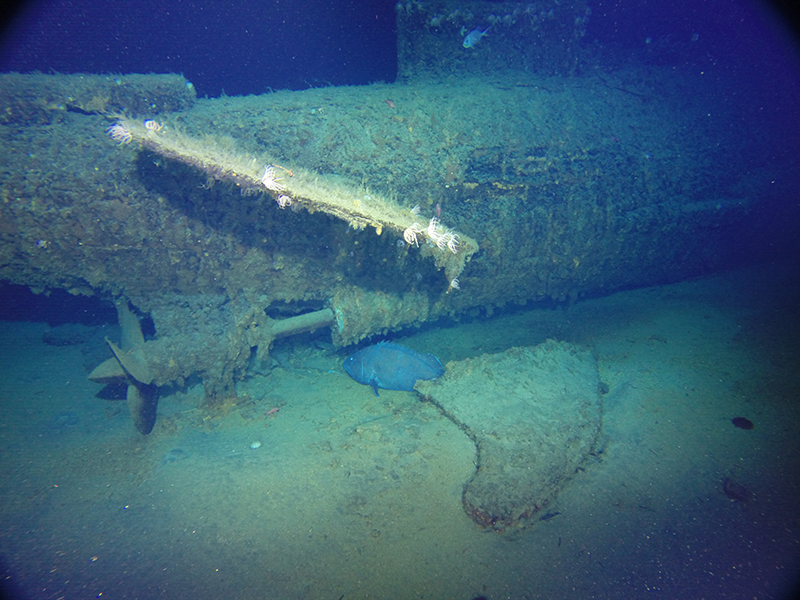
While still largely intact, the submarine’s hull has been detrimentally affected by differential corrosion of its various metallic components. This is perhaps most evident in the destruction of most of AE1’s saddle ballast tanks, which were constructed of lighter-grade steel than the pressure hull and appear to have preferentially corroded, fragmented and collapsed to the seabed. Other disarticulated hull elements observed during the survey include AE1’s hydroplane guards, rudder and skeg. All four guards are lying flat on the seabed, just beneath their respective hydroplanes. While natural processes such as corrosion could have caused them to fall away from the hull, a more likely explanation is that they snapped off as AE1 fell onto its keel after initially striking the seabed stern first and pitching forward. As regards the hydroplanes themselves, the 2018 survey confirmed that both fore and aft sets were in the ‘hard-to-rise’ position, which indicates the crew desperately attempted to recover from a dive and return to the surface. AE1’s rudder and skeg were found lying beneath the port side propeller. Both appear to have been broken off by the submarine striking the seabed stern first; however, the angle of the impact was shallow enough that it did not damage AE1’s propellers.
AE1’s disarticulated skeg and rudder lay on the seabed beneath the submarine’s port propeller. Image: Paul G. Allen, Find AE1 Ltd., ANMM and Curtin University. Copyright, Navigea Ltd.
It is worth noting that deterioration and disarticulation of specific hull components may also have been facilitated by tectonic activity around New Britain and the Duke of York Islands. The fin, for example, has collapsed further into the control room since AE1’s discovery in December 2017 (and in the wake of large earthquakes and accompanying aftershocks in New Britain in March 2018). While there is clear damage to the submarine from natural processes, no evidence of human-manifested change (such as anchor or trawl damage) was noted. Indeed, unlike many historic shipwreck sites in shallow water and/or more developed areas, AE1 appears to be relatively free of modern rubbish and debris.
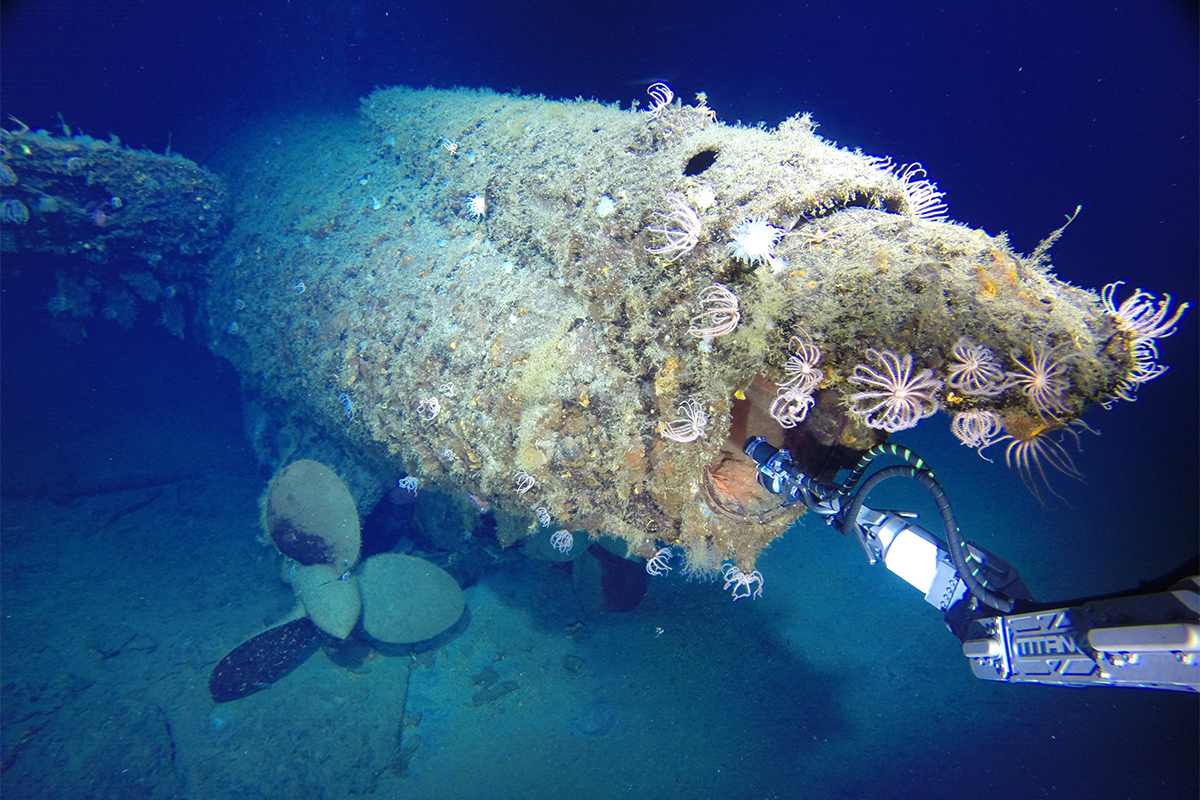
The starboard propeller, after hydroplane guard and resident grouper. Image: Paul G. Allen, Find AE1 Ltd., ANMM and Curtin University. Copyright, Navigea Ltd.
Conclusion
The 2018 ROV examination and photogrammetric survey of AE1 proved immensely successful. In addition to acquiring detailed still and video imagery, the effort has already resulted in production of an interim 3D digital model of the entire shipwreck site. This in turn has facilitated archaeological examination of AE1 on a macro scale, and led to the identification of large-scale features—such as the slump in the submarine’s hull that has resulted from the break near Frame 70—that otherwise may have gone unnoticed. A significantly more detailed high-resolution photogrammetric model of AE1 is currently being generated at the Curtin HIVE, and is expected to offer even greater opportunities for analysis, interpretation and—eventually—exhibition.
Lessons learned during the 2015 photogrammetric survey of Sydney and Kormoran were put to good use during the AE1 expedition, with the result that the latter shipwreck received effective, comprehensive photographic coverage in a short span of time. The survey also revealed—through the use of only one uncomplicated and inexpensive camera for photogrammetric capture—that much can be accomplished with relatively little.
Imagery and data collected during the survey has also refined and contributed to an understanding of the sequence of events that led to AE1’s loss.
Imagery and data collected during the survey has also refined and contributed to an understanding of the sequence of events that led to AE1’s loss. For example, the submarine’s bow and stern torpedo tube caps were found to be either partially or fully open, and that this appears to have been an intentional act carried out on the surface.
Why the caps were open, and whether they contributed in some manner to the loss will likely never be known.
Similarly, the reason that the ventilation valve was partially open will probably never be solved, but it is fair to say that it was one of the root causes of the submarine’s demise once it began to submerge on what would be its last dive. Despite efforts by the crew to recover—as evidenced by the positions of the hydroplanes—AE1 was overwhelmed by the inflow of water through the ventilation valve and began to sink by the stern.
At an unknown depth, the forward pressure hull partially imploded, killing the crew instantly.
At an unknown depth, the forward pressure hull partially imploded, killing the crew instantly. The submarine continued its fatal dive until it struck the seabed stern first at a shallow angle, breaking off the skeg and rudder. The hull then pitched forward, breaking AE1’s back and possibly snapping off all four hydroplane guards. This violent movement also affected the fin, which—likely already weakened structurally during the implosion—began to topple forward into the control room.

Interim full HMAS AE1 model, viewed from the starboard side. Image: Paul G. Allen, Find AE1 Ltd., ANMM and Curtin University. Copyright, Navigea Ltd.
Going forward, the imagery and 3D model generated as a result of the 2018 investigations will prove critical in AE1’s ongoing interpretation, exhibition and management. Among other things, the survey revealed that the shipwreck site is in a state of rapid natural decline, as differential corrosion—and contributing factors such as local seismic activity—takes its toll on the submarine’s constituent parts.
The interim photogrammetric 3D model already generated now serves as an accurate representation of AE1’s state of preservation when discovered, and can be the benchmark by which future surveys of the site may be compared. It can also serve as the foundation upon which a variety of innovative interpretive and exhibition outcomes may be explored and developed to share AE1’s story for years to come.
Credits
Supported by
The successful search for HMAS AE1 was made possible through the support of the Department of Defence and generous donations made from the following individuals and corporations:
- News Corp
- John and Jacqui Mullen
- The Commonwealth Bank
- Fugro
- The Goodman Group
- The Tzaneros Family
- The Macquarie Group and Directors
- The Macquarie Group Foundation
- Goldman Sachs Gives on behalf of Christian Johnston
- Australian Capital Equity
- Navantia Australia
- Qantas Airways Limited
- Malcolm Broomhead
- Peter Dexter
- The Janes Family
- Guy and Debbie Templeton
- Rob Sindel